As DIY enthusiasts, we all love the satisfaction of fixing something ourselves. Plumbing, however, can be a daunting task, especially when it involves the necessary functions of a bathroom. A common bathroom issue is the toilet flapper needing replacement. But don’t fret, this article aims to guide you through the process, breaking down the steps to replace a toilet flapper with ease and precision.
Table of Contents
Understanding the Role of the Toilet Flapper
At the heart of your toilet’s flushing mechanism lies a humble yet essential part – the flapper. It’s a small rubber component that plays a vital role in controlling the flow of water from the tank into the bowl. Here’s how it works: when you press the flush lever, the flapper opens up, allowing a rush of water from the tank into the bowl. Once the tank is filled again, the flapper shuts down, sealing off the tank and preventing a non-stop water flow into the bowl.
While it may seem insignificant, a faulty flapper can lead to inefficient flushing or, worse, leaks. Over time, wear and tear can lead to the flapper becoming warped or misaligned. When this happens, water may continuously leak into the toilet bowl, causing a constant running water sound. On the flip side, an improperly sealing flapper can cause a weak flush, as not enough water is released from the tank.
So, it’s clear that this small rubber device plays a crucial role in the overall functioning of your toilet system. Understanding its operation is the first step in diagnosing and fixing any potential issues. And while it may seem intimidating, remember that flapper replacement is usually a straightforward DIY task – perfect for all the DIY enthusiasts out there. Stay tuned for more on when to replace your flapper and the steps to do it.
When to Replace Your Toilet Flapper
Spotting the signs that your flapper needs replacing can save you from potential headaches down the line. Here’s the scoop: if your toilet has suddenly developed a fondness for running non-stop or is giving lackluster flushes, your flapper could be to blame. An unexpected surge in your water bill or the inconvenience of having to flush twice can also be tell-tale signs of a flapper on its last legs.
A physical inspection can reveal a warped or visibly damaged flapper that is due for a change. And if you’re scratching your head trying to remember when you last replaced it and drawing a blank, it’s likely been too long. Generally, if it’s been five years or more since your last replacement, it’s time for a new flapper. So keep these tips in mind to ensure your toilet continues to function optimally!
Tools Needed for Toilet Flapper Replacement
Ready to roll up your sleeves and replace that toilet flapper? Brilliant! You’ll need just a few basic items to get the job done. Start by grabbing a pair of gloves – because let’s face it, this isn’t the cleanest job in the world. A towel will also come in handy for mopping up any water that spills during the process. Now, for the star of the show – the new flapper.
Remember, flappers aren’t one-size-fits-all, they come in a range of styles and sizes. Make sure you’ve got the right one for your toilet model. When in doubt, your old flapper can serve as a helpful guide. Simply take it to your local hardware store and they should be able to assist you in finding a matching replacement. It’s time to say goodbye to that faulty flapper and hello to efficient flushing!
Related Content: Fill Valve Replacement
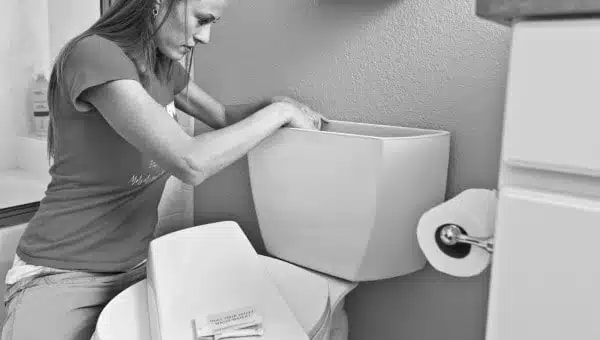
Step-by-Step Guide to Replacing the Toilet Flapper
Alright, DIYers, it’s game time! Replacing a toilet flapper doesn’t have to be as daunting as it sounds. Let’s break it down into easy-to-follow steps, and remember, slow and steady wins the race!
- Start by turning off the water supply to your toilet. This is usually a small valve located near the base of your toilet. Give it a twist, and you’re good to go.
- Next, give the toilet a good flush. This will empty the tank and make it easier for you to access the flapper.
- With your gloves on, gently remove the old flapper. Most flappers are connected to the toilet handle lever with a chain. Just unhook the chain, slide the flapper off the overflow tube, and voila! You’ve successfully removed the old flapper.
- Now, onto the fun part – installing the new flapper! This is as simple as reversing the removal process. Position the new flapper onto the overflow tube, ensuring it fits snugly. Then, connect the chain to the toilet handle lever. Be sure to check the chain length, allowing just enough slack for the flapper to seal properly when not in use.
- With the new flapper securely in place, turn the water supply back on. Wait for the tank to fill, then give your toilet a victorious flush! If all has gone according to plan, you’ll notice the improved flush power and absence of any running water sounds.
There you have it – a simple, fuss-free guide to replacing your toilet flapper. Remember, every DIY journey starts with a single step. Today, it’s a toilet flapper, who knows what tomorrow will bring? So, let’s keep our tools ready and spirits high for the next DIY adventure!
Related content: Improving Toilet Performance
Avoiding Common Flapper Replacement Mistakes
We’ve all been there – confidently finishing a DIY task, only to find out we’ve made a small error that throws everything off balance. So, let’s make sure your flapper replacement goes off without a hitch.
Here’s the skinny: first and foremost, you need to ensure you’ve got the right type of flapper. There are several styles and sizes, and using an incompatible one simply won’t do the trick. If you’re feeling unsure, remember that your old flapper is your guide – use it to find a matching replacement.
Next up on our list of common pitfalls is the chain length. Too short, and your flapper won’t seal properly, causing continuous water flow. Too long, and it could get caught under the flapper, again causing a leak. The key is to find the Goldilocks zone of chain lengths – just right!
Finally, before you install the new flapper, don’t forget to clean the area around the overflow tube. A clean surface will ensure a good seal, preventing any future leaks.
As you can see, avoiding these mistakes isn’t rocket science, it just takes a bit of attention to detail. Armed with these tips, you’re well on your way to a successful flapper replacement! Let’s make those toilet troubles a thing of the past.
When to Consult a Professional Plumber
Sure, we’re all about the DIY spirit here, but let’s be honest, there are times when it’s best to dial up a pro. Think of it like this: replacing your toilet flapper is usually a walk in the park, but if it still hasn’t fixed your water woes, it’s time to call in the cavalry. Any signs of water damage around your porcelain throne? Yeah, that’s another clear signal to get a local plumber involved.
You see, these could be symptoms of a bigger issue that’s out of our DIY realm. And remember, it’s not about admitting defeat; it’s about knowing when to ask for help. It’s like going to the doctor when you’re sick – you wouldn’t try to perform surgery on yourself, would you?
The same principle applies here. When things get too technical or you’re unsure about any part of the process, it’s always smarter to seek professional advice. After all, the goal here is to solve the problem, not create new ones.
FAQs
Are flappers for toilets universal?
Negative. Universal designs like as the Fluidmaster flappers can be used as replacements for most other flappers, but there are also specialized flappers designed for certain flushing systems.
How often do toilet flappers need to be replaced?
Certain drop-in bowl cleansers can also cause damage to the rubber flapper component. As the flapper deteriorates, it permits the escape of fluid. While it may not be a commonly considered item for regular maintenance, it is generally recommended to replace a toilet flapper every three to five years.
How do I make my toilet flapper seal better?
Modify the length of the chain to ensure that the flapper achieves full closure without excessive tension. Substitute the flapper with a more recent, superior model that is specifically engineered to inhibit leaks. Install a toilet flapper equipped with an integrated water-conserving mechanism to minimize water wastage and avert leakage.
Conclusion
So keep those DIY fires burning, but also know when to pass the torch. This balance is the true essence of DIY – you’re doing it yourself, but you’re never really alone in the process. And there’s comfort in knowing that, isn’t there? So go on, brave DIYers, tread the path of toilet repairs with confidence, armed with the knowledge of when to call for reinforcements.
