In the midst of modern living, many homeowners are increasingly looking for ways to maximize their living space, streamline their maintenance duties, and generally improve their home’s comfort and value. One such practical home improvement option is a tub shower conversion. Here, we explore the simple process and multiple benefits of tub shower conversion, a modification that promises to give your bathroom a contemporary flair.
Table of Contents
What is a Tub Shower Conversion?
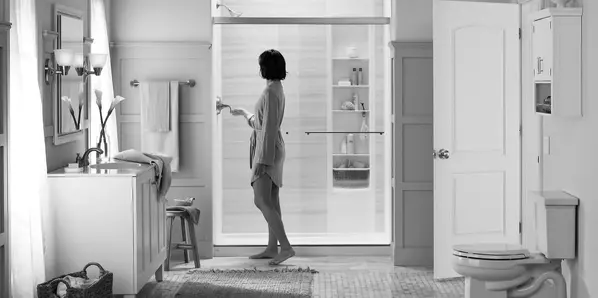
A tub shower conversion is essentially a process of switching out your traditional bathtub for a more functional, walk-in shower. This upgrade is increasingly gaining traction among homeowners who aim to elevate their bathroom functionality, ease of maintenance, and visual appeal. Executing a tub shower conversion is generally a straightforward undertaking. With the support of seasoned professionals, it can be wrapped up within a few days, mitigating any potential disruptions to your everyday household activities.
Easy Access and Safety First
A tub shower conversion offers more than just a refreshed aesthetic, it provides an essential feature of accessibility and safety. Navigating a conventional tub’s elevated edge can be a challenge, especially for households with small children or those with mobility limitations. A walk-in shower, on the other hand, offers a significant safety upgrade by eliminating this hurdle.
The seamless entry and exit provided by a shower stall can help prevent slips and falls, making bath time safer and less stressful for everyone. Beyond that, many walk-in shower designs incorporate additional safety features, such as non-slip flooring and conveniently placed grab bars.
These thoughtful elements further enhance the safety of your bathing space while adding to its functionality and ease of use. All of these factors contribute to the peace of mind that comes with knowing your bathroom is a secure space for every member of the household.
Save Space and Create a Modern Look
In many homes, the bathtub is the largest fixture in the bathroom, consuming valuable floor space. When you decide to transition from a bathtub to a shower, you’re essentially reclaiming this space, thus giving your bathroom a more open and airy feel. A shower stall, particularly one with transparent glass doors, helps to visually expand your bathroom, resulting in a perceived increase in size.
More than just a space-saver, this conversion also paves the way for a stylish and contemporary update. In line with today’s home design trends, many homeowners are drawn to the minimalist, clean lines of a walk-in shower. They lend a modern touch to your bathroom, turning it into a sleek and sophisticated oasis in your home. This stylistic transformation can help your bathroom stand out, making it a highlight in your home’s overall interior design.
The strategic use of shower materials can further enhance your bathroom’s modern aesthetic. For instance, the use of large-format tiles can create a seamless, streamlined look, while fixtures with sleek metallic finishes can add a touch of luxury. Adding a shower niche or a built-in shelf not only serves a functional purpose but can also contribute to the overall design aesthetic.
In essence, a tub shower conversion allows you to reinvent your bathroom. By providing you with the opportunity to save space and create a modern, minimalist aesthetic, this change can enhance the enjoyment of your daily routine and give your bathroom a refreshing new look.
Maintenance Made Simple
One of the primary advantages of a tub shower conversion is the reduction in cleaning and maintenance tasks. Showers, particularly those with contemporary, streamlined designs, are typically less challenging to clean compared to traditional bathtubs. Bathtubs can be quite cumbersome to clean, due to their shape and size. They are also often more susceptible to mildew, soap scum, and other types of bathroom grime.
In contrast, showers are more straightforward and quick to clean, significantly reducing the time spent on bathroom maintenance. This is particularly true for showers that feature minimalist designs with less crevices where dirt and grime can build up. They can be easily wiped down after use, and regular cleaning can prevent the accumulation of soap scum and mineral deposits, making your bathroom space healthier and more hygienic.
Showers also lend themselves to the use of modern materials and finishes that are resistant to mold and mildew. These include non-porous surfaces such as glass and ceramic tiles that are easy to clean and maintain. Additionally, the installation of a handheld showerhead or a shower system with multiple jets can make rinsing the shower area a breeze.
The simplified maintenance is not only a time-saver but also contributes to the overall longevity of your bathroom. With less grime build-up, you reduce the risk of permanent stains or damage, extending the life of your bathroom fixtures. Thus, a tub shower conversion not only enhances your bathroom’s aesthetic appeal but also simplifies your life by making cleaning tasks more manageable.
Boost Your Home’s Value
Opting for a tub shower conversion goes beyond just personal enjoyment and satisfaction; it also serves as a financial investment in your property. Today’s real estate market trends reveal a high demand for homes with modern and accessible features. This demand stems from a wide range of buyers, including the younger generations who appreciate sleek, contemporary designs, and the older demographic that values ease of access and mobility.
When you transform your traditional tub into a walk-in shower, you are not only cultivating a more pleasant and convenient living space for yourself but also making your property more attractive to potential buyers. The stylish, functional, and easy-to-maintain features of a walk-in shower can be a major selling point.
Of course, it’s not just about selling your home in the short term. In the long term, this improvement may translate into a higher resale value, given its timeless appeal and practicality. Therefore, your tub shower conversion could serve as a smart investment strategy that boosts your home’s market worth over time.
However, it’s also essential to note that while walk-in showers are desirable, some potential buyers, especially families with young kids, might still prefer having at least one bathtub in the house. So, it’s a good idea to maintain a balanced approach by retaining one tub, particularly if you have multiple bathrooms. This way, you can still cater to a broad spectrum of buyer preferences and needs, thereby enhancing the marketability of your property.
Considerations and Costs
Embarking on a tub shower conversion requires some thought about the involved expenses and factors. The cost of this transformation can differ greatly, depending on aspects like the intricacy of the work, the selection of materials, and the labor charges in your locale.
Keep in mind, the appealing nature of a shower installation may be diminished for certain potential buyers if all bathtubs are removed from the home. Families with young children, in particular, often still see value in having a bathtub. For this reason, it’s advisable to maintain at least one bathtub in your dwelling to optimize potential resale appeal.
Before making the switch, carefully weigh these considerations and consult with a professional to ensure the conversion aligns with your budget, design preferences, and long-term plans.
FAQ’s
What does it cost for a tub shower conversion?
It usually costs between $1,800 and $4,430 to turn a bathtub into a shower. This includes the cost of materials and work. The old bathtub will be torn down and thrown away, a new shower enclosure and glass door will be put in, any new fixtures will be added, and the wiring will be fixed as needed.
Should you change your tub into a shower?
The tub you have now might be 5 feet long or longer, which takes up a lot of room. You will have a lot more space in the bathroom if you switch from a tub to a shower. You can make your bathroom a lot more useful and better for your family with the extra space you now have.
Is changing the tub to a shower bad for the home’s selling value?
How long do you plan to live in your current home? This will help you decide if a tub-to-shower change is right for you. In the next 10 years, if you want to sell your house, getting rid of your tub might make people less interested and lower their offers.
Do you have to move the drain when you change from a tub to a shower?
The original 1-1/2 inch pipe worked fine when I turned a tub into a shower. Your pan will have to slope more from one end to the other than if the drain were in the middle, bou can leave the drain at one end.
Conclusion
Remodeling a bathroom requires proper planning and thoroughness to ensure the right plumbing and zero leaks. It may cost more initially to engage an expert, but you will be more confident about the proper execution of the work.
