When it comes to home improvements, many DIY enthusiasts are increasingly keen to get their hands wet – literally. Whether it’s a bathroom remodel or kitchen update, there’s something satisfying about handling your own plumbing. It saves money and can be a great learning experience. However, plumbing work can also be intimidating, especially for beginners. That’s why we’ve put together this handy guide to tackle five quick fixes every DIY plumbing enthusiast should know.
Table of Contents
Unclogging Your Drain Without Harsh Chemicals
A stubbornly clogged drain can be an exasperating experience. While you might be tempted to grab that bottle of harsh chemical drain cleaner from your cupboard, consider this: those aggressive substances can do a number on your pipes over time. Fear not, for we have an eco-friendly and equally effective solution!
This quick fix involves common household items: baking soda and vinegar. This dynamic duo can be a lifesaver in your battle against clogs. Start by mixing 1/2 cup of baking soda with 1/2 cup of vinegar. You’ll notice an immediate reaction as the two ingredients begin to fizz, a clear sign of their cleaning power in action. Once the excitement subsides, pour the solution down the problematic drain.
Now, patience is key. Allow the baking soda and vinegar to sit for around 15 minutes. This gives them enough time to break down the offending gunk clogging your drain. Once the time has elapsed, follow up with a good amount of hot water to rinse everything down. You’ll find this natural solution is not just kind to your pipes, but it also leaves your drain smelling fresh.
Of course, as with all DIY plumbing fixes, if the problem persists, it’s wise to consult a plumbing professional. But in the meantime, remember this simple solution next time you’re faced with a clogged drain – no harsh chemicals required!
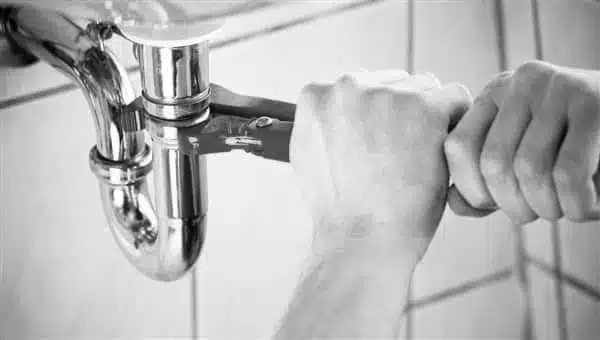
Fixing A Leaky Faucet to Conserve Water
There’s something about the steady drip of a leaky faucet that can drive even the most patient person up the wall. But annoyance aside, did you know it’s also a colossal waste of water? Those pesky drops can result in a shocking amount on your monthly water bill. But fret not, fixing this issue isn’t as daunting as it may seem.
First things first, it’s essential to turn off your water supply. The last thing you want is a geyser in your bathroom or kitchen! After that’s done, your next task is to remove the faucet handle, revealing the packing nut underneath. Go ahead and remove that too.
Now you’ve got your first glimpse of the stem, remove this component as well. Below the stem, you’ll find the washer – the piece you’re likely here for. If your washer appears damaged or worn, this could be the cause of your leak.
The next step is to replace the faulty washer. Once you’ve swapped it out with a new one, you can begin reassembling the faucet. Put back the stem, followed by the packing nut, and finally the handle.
Et voila! With your newly repaired faucet, the ceaseless drip should be a thing of the past. Not only have you conquered a common plumbing problem, but you’ve also taken a step towards water conservation. Remember, every drop counts, and your efforts make a difference.
While this fix usually resolves most leaky faucet issues, don’t be disheartened if the problem persists. Sometimes, faucets can be stubborn, and it’s perfectly okay to call in a professional plumber for help. After all, we can’t all be DIY masters! For now, enjoy your victory over the drip, drip, drip, and look forward to a quieter, and more eco-friendly home.
Replacing a Toilet Flapper to Prevent Running Toilets
An incessantly running toilet can skyrocket your water bill faster than you can say “plunge!” More often than not, a mischievous toilet flapper is behind this wasteful woe. Fear not, my fellow DIY devotees, for this is a task you can tackle in no time.
Your first port of call? Halting your toilet’s water supply. This crucial step ensures your bathroom won’t transform into a miniature water park during the process. Once that’s taken care of, you’re ready to unmask the culprit. Typically, you’ll find the old flapper connected to the toilet handle by a humble chain – give it a tug, and it’s ready to be replaced.
Next comes the fun part – installing the new flapper. It’s a straightforward swap – just attach it where the old flapper once clung. Once the new flapper is secure, take a deep breath and turn the water back on. If all has gone according to plan, your toilet should now only spring to life when required, saving you both water and unnecessary stress.
Remember, in the world of DIY, patience is as crucial as a well-stocked toolbox. If the problem persists, don’t hesitate to reach out to a professional plumber. But for now, bask in the glow of your successful DIY plumbing feat. The only running you need to worry about now is your victory lap!
Related Content: Laundry Room Tips
Unclogging Your Showerhead for Better Water Pressure
There’s nothing quite as rejuvenating as a refreshing shower with optimal water pressure, right? But what happens when your shower starts to dribble rather than gush? Don’t fret! Chances are, your showerhead has been taken hostage by troublesome mineral deposits. These little intruders tend to accumulate over time, blocking those tiny holes that allow water to flow freely. But worry not, fellow DIYers, because there’s a surprisingly simple solution to this common conundrum.
Firstly, you’ll need to liberate your showerhead from its holder. Once you’ve managed that, grab a bowl and fill it with vinegar. Yes, vinegar! This household staple is not just for salads, it’s also a proven enemy of mineral deposits. Submerge your captured showerhead in the vinegar and let it soak for a couple of hours. Think of it as a well-deserved spa session for your hardworking shower companion.
As the vinegar works its magic, it will gently dissolve the mineral deposits, effectively unclogging your showerhead. Once the soak is complete, give the showerhead a good rinse. This will remove any lingering vinegar and dislodged debris, ensuring a fresh start for your revitalized showerhead.
With that done, it’s time to reinstall the showerhead. This is where you get to reap the rewards of your labor. As you step under the shower, you’ll experience the return of that glorious water pressure. And just like that, you’ve returned your shower to its former glory with minimal fuss.
This simple fix is just another way you can conquer your bathroom’s plumbing challenges. So, the next time your shower fails to deliver the pressure you desire, remember this vinegar trick. And as always, if the problem persists, it’s always a good idea to enlist the help of a professional plumber. But until then, enjoy your newfound shower power!
Sealing Leaky Pipes While Waiting for Repair
It happens to the best of us – you spot a leak in your pipes and realize that this is a job for a professional. But, while you’re playing the waiting game for your trusty plumber to arrive, there’s an easy peasy DIY solution to prevent your home from turning into a mini indoor pool: using waterproof tape or a pipe repair clamp.
Waterproof tape is not only easy to apply, but it also forms a strong seal that can combat those pesky water leaks. All you need to do is to wrap the tape tightly around the leaky area until it’s completely covered. As for the pipe repair clamp, it’s just as effective and easy to use. Simply wrap the clamp around the damaged pipe and tighten the screws to form a waterproof seal. Voila! The leaking should stop, at least temporarily.
Now, let’s get something straight: these fixes aren’t meant to replace professional repair. They are temporary solutions, superstars at keeping the water at bay until the cavalry arrives. Therefore, once you’ve done your part, make sure to keep that appointment with your plumber.
Read more plumbing tips at our Blog
FAQs About Our Five Quick Plumbing Fixes
Is plumbing difficult to do-it-yourself?
Acquiring the necessary abilities for this career is feasible, if intricate and arduous. Improper execution may pose a risk. Water heaters require either gas or electrical connections and might pose a risk if not installed or repaired properly.
What is the most challenging aspect of plumbing?
The job of a plumber is challenging due to its strenuous physical requirements. Plumbers frequently encounter confined areas, such as crawl spaces and attics, where they must handle and manipulate bulky pipes and equipment.
Am I capable of performing my own bathroom plumbing?
Although it is technically feasible to undertake the plumbing of an entire bathroom independently, it is advisable to delegate at least a portion of this task to professional plumbers. Undertaking rough-in bathroom plumbing is a challenging task that is not recommended for do-it-yourself projects. Improper installation of water lines or drainpipes may lead to leaks within your walls, causing substantial damage.
Conclusion
By taking matters into your own hands, you can reduce damage and prevent further issues from developing. But, as always, don’t be disheartened if the leakage continues after your efforts. Sometimes, you’ve got to know when to throw in the towel and leave it to the pros. In the meantime, pat yourself on the back for being proactive and doing your best to protect your home!
