In your journey as a new homeowner, it’s only a matter of time before you’ll face your first minor plumbing issue, such as a faucet aerator replacement. Faucet aerators are crucial in controlling the stream of water from your tap, and when they start to fail, you might notice inconsistent water flow, sputtering, or excessive water usage. However, with some guidance, this is a task you can handle on your own.
Table of Contents
Identifying a Problem with Your Faucet Aerator
A crucial first step before you begin your faucet aerator replacement is to ensure that the problem truly lies with your aerator. An array of indicators can hint at a malfunctioning aerator. If you experience sporadic or uneven water flow, water splashing out rather than flowing in a consistent stream, or a noticeable decrease in your water pressure, then it’s likely that your aerator is at fault.
Another sign to watch out for is a spike in your water bill. A malfunctioning aerator can cause an increase in water consumption, leading to higher bills. Once you’ve successfully identified these symptoms, you can proceed with confidence, knowing that replacing the aerator is indeed the solution to your faucet woes.
Gathering Your Faucet Aerator Replacement Tools
Embarking on your faucet aerator replacement task doesn’t necessitate an expansive toolbox. Quite the opposite, in fact. This job requires only a handful of tools: a wrench, a towel or cloth, a new aerator, and a small amount of teflon tape.
The wrench will be used to unscrew the old aerator and secure the new one in place. A towel or cloth is essential to prevent damage to the faucet’s finish when using the wrench. It acts as a protective barrier between the wrench and the faucet.
As for the new aerator, it’s paramount to ensure that it matches your current one. Aerators are not a one-size-fits-all type of component; they come in different sizes and types, each designed for specific faucets. To avoid any misfits, remove your old aerator before making your purchase, and take it with you to the store. This way, you can compare it with the new ones available and ensure a proper match.
Lastly, don’t forget to get some teflon tape. This tape is essential in creating a watertight seal around the threads of the faucet where the aerator will be installed. This helps to prevent any potential leaks post-installation and facilitates the installation process.
With these tools at hand, you’re set to start your faucet aerator replacement. Don’t be intimidated by the task ahead, armed with the right tools and the steps outlined in this guide, you’ll navigate this home repair with ease.
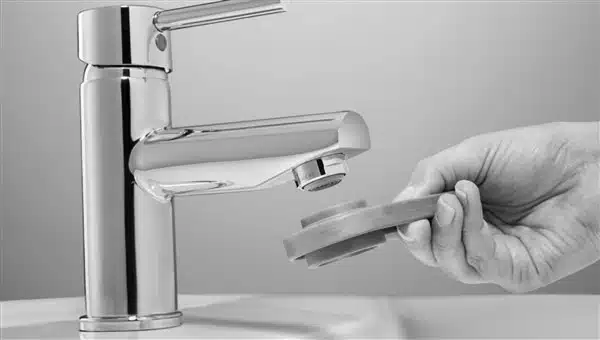
Removing the Old Faucet Aerator
Kickstarting your faucet aerator replacement begins with carefully taking off the old aerator. First off, position a soft cloth or towel over the aerator. This barrier serves to guard your faucet’s finish from potential scrapes or scratches that could be inflicted by the wrench.
Following that, take your wrench and gently start to loosen the aerator from the faucet, ensuring you’re moving in an anticlockwise direction. If the aerator seems stubbornly attached, apply a little more force incrementally until it begins to yield. As soon as the aerator becomes loose enough to turn by hand, cease using the wrench and continue the unscrewing process manually.
Remove the aerator completely and set it aside. By accomplishing this, you’ve taken the first step in your faucet aerator replacement and are well on your way to resolving your faucet issues.
Preparing the New Faucet Aerator for Installation
Now that you’ve successfully removed the old aerator, it’s time to get the new one ready for installation. Depending on the design of your faucet, you’ll either be installing a male aerator (for faucets with external threads) or a female aerator (for faucets with internal threads).
The first step in preparation is to apply the teflon tape. This essential item assists in the formation of a watertight seal and simplifies the installation process. Wrap the teflon tape in a clockwise direction around the faucet’s threads. Ensure it’s snug but not overly tight, as this could interfere with the installation. With the teflon tape in place, you’re now ready to move forward with the installation of the new aerator, one step closer to resolving your faucet problems.
Installing the New Faucet Aerator
As you gear up to install the new faucet aerator, the most crucial part is to ensure proper alignment to avoid cross-threading. Begin by gently threading the new aerator onto the faucet by hand. Once you’ve secured it as tightly as possible with your fingers, use the cloth to protect the aerator from the wrench’s rough grip.
Gently secure the wrench around the cloth-wrapped aerator and give it a final quarter turn. This extra nudge is vital to ensure a secure fit, but it’s important not to overdo it. Applying too much force or over-tightening can result in damaging the threads, leading to potential leaks. The goal is a snug fit – tight enough to prevent water leakage but not so tight that it causes damage.
With the new aerator firmly in place, you’re almost done with your faucet aerator replacement. The last step is to test the new installation to make sure everything is working perfectly.
Testing Your New Faucet Aerator
Having successfully installed the new aerator, the final phase of your faucet aerator replacement mission is to test its functionality. This is a straightforward process that entails observing the water flow and checking for any possible leaks. Start by gently turning on your faucet and closely watch the water stream. It should come out in a consistent, non-spluttering flow, and the water should not splash around, which indicates a well-installed aerator.
Additionally, pay attention to the area surrounding the base of your faucet. Ensure no water seeps or drips from the join between the faucet and the newly installed aerator, signifying a good seal and correct installation. Should you observe any leaks, it might suggest an over-tightened or cross-threaded aerator, in which case you may need to repeat the installation process. Remember, the key is a snug fit, not an overly tight one.
Suppose everything appears in order, with a steady water flow and no visible leaks. In that case, you can pat yourself on the back. You’ve just successfully carried out your faucet aerator replacement! This home repair adventure is a testimony to your growing competence in home maintenance and your readiness to take on more. Here’s to the next homeowner challenge you’ll conquer with ease!
Conclusion
As a homeowner, facing plumbing issues can be an arduous task that often arises without warning, necessitating prompt attention and causing substantial unplanned expenses. Nevertheless, Clovis Plumbing Services, a trusted local service provider in Clovis and Fresno, California, is here to alleviate your worries. In this blog post, we will discuss how our plumbing services can help you reduce expenses without compromising the quality of service you receive.
